Your ultimate guide to creating a user journey map with step-by-step instructions, a template, and an example to follow
Creating a user journey map has many benefits for both your users and your team. A journey map will help you discover friction points for the user and opportunities to improve user experience. Ultimately, you’ll discover opportunities to increase engagement and build customer loyalty.
The process of creating a user journey map will help foster team alignment, clarify priorities and surface opportunities for increased revenue or saved customer service costs. Creating a journey map means that you’re prioritizing user experience as a means to create long-term value.
Download our Customer persona guide and template
Understand your primary customers and start creating more consumer-centric web experiences with our customer personas guide and template.
Access the Customer persona guide and template
Template to use
Don’t be intimidated by the thought of jumping straight into creating your user journey map. Starting with a blank page is the hardest part, so I’ve provided an example to help get you started.

Your journey map is divided into three important elements: the user profile, user actions with thoughts and feelings that accompany those actions, and opportunities.
The user profile includes any information you have about your user, but the most important thing to include is their main objective and expectations.
Below the user profile at the top of your journey map, you should include the phases the user goes through. For example, in my map the phases are Search, Read, and Choose. After you’ve outlined your phases, the rows on the left side will be labeled, Actions, Thoughts, Emotions, and Opportunities.
You can certainly adapt this template to your needs. My example is meant to focus on user friction points and experience. It’s also meant to be created by non-designers. In other words, anyone can create this user journey map and it’s okay for it to be text-heavy. Visual elements can sometimes detract from or muddy the meaning, so it’s often easiest to start with everything written out.
Download our Customer persona guide and template
Understand your primary customers and start creating more consumer-centric web experiences with our customer personas guide and template.
Access the Customer persona guide and template
User profile
If this is your first time writing a user profile, it will be full of best-guesses and that’s okay. Try to identify the main triggers or reasons that bring people to your user path. They might be looking to have a question answered or they may want to compare products. Whatever the case may be, you should agree on one primary user profile.
The hardest part is narrowing your audience. You may have stakeholders who insist your audience is everyone, but the purpose of defining a primary user isn’t to exclude people. You need to pinpoint your most important audience so you can make sure everything in the path caters to them. That doesn’t mean you can’t have other things on the page that cater to other users, but it does mean everything on the page should be useful to your primary audience.
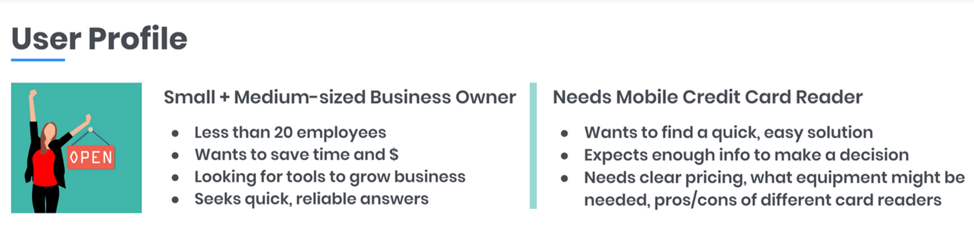
The best way to limit the parameters of your user profile is to ask yourself, "Does everyone in this group have the same objective coming to this page?" With my example user journey, you can see everyone has the same objective: they’re a small business owner who wants a mobile credit card reader. It doesn’t include other audiences or decision-makers. It doesn’t include other reasons people may visit the page. It’s limited to one specific objective.
Journey phases
Below the user profile, you’ll identify the user journey phases. You’ll want to align with coworkers on how you’re deciding which experience to map. You can choose a user journey that’s limited to one channel or device or choose a path that’s across multiple channels and devices.
You can zoom in or out to make a very simple or very complicated map according to your needs. You can choose a map that you know can make an immediate impact on revenue or prioritize a map that you know will be easy to tackle for your first run because you have a lot of internal information on the user objective and path.

If this is your first time creating a user journey map, I’d recommend sticking to one channel and one or two devices. For example, you might create a journey map for a user navigating to a page on your website and showing their interactions, as in my example. That way you can become comfortable with the process of creating a map and cultivate understanding from your team.
If you already feel comfortable with user journey mapping, you’ve done it before, and you have buy-in from other people on your team, you may want to create a more complicated journey map, showing how a user interacts with your brand across channels and devices.
Maybe you have a journey path that includes someone navigating to your desktop and mobile sites, using a chat function, making a phone call to customer service, or clicking on a retargeting ad. You could even map a journey across months, as long as you’re including the same user profile with the same objective.
Download our Customer persona guide and template
Understand your primary customers and start creating more consumer-centric web experiences with our customer personas guide and template.
Access the Customer persona guide and template
How to approach
Once you’ve defined your template, user profile, and journey phases, you’re ready to dig in and create your map. You can approach this in two different ways. You can structure a workshop with your cross-functional team and create the map together, or you can dive into user research and create the map once you have more data to back-up the assertions of your map.
If this is your first user journey map, I’d recommend diving in headfirst. Put a workshop on the calendar with your team, have everyone go through the user path and have everyone take notes on their thoughts and emotions throughout the process. Then discuss commonalities between everyone and opportunities surfaced from this experience. You’ll all need to acknowledge that this is the first stab at a journey map, so it’s going to be full of best-guesses and biases, but that’s okay. You’ll have a document to test against and a baseline to start from.
If you’ve already created user journey maps before and you have the buy-in of your team, it might make sense to dive into user research before creating another map. You can conduct user research through surveys or interviews with users or observing and identifying real experience from users. Then you’ll create a user journey map that should pretty closely resemble reality. The reason I don’t recommend doing this for your first user journey map is that it’s time-consuming.
If you’re already trying to prove the value of your user journey map and obtain buy-in from coworkers, it takes way more time to produce a journey map this way and it can feel a little more forceful or directional coming from you without as much input from your team. For new UX practitioners, I’d recommend getting a journey map done ASAP so your team can understand the value, and go back and validate or invalidate with research.
Creating the map
When you’re ready to fill out your map, you’ll note the actions the user takes throughout the process, along with thoughts and emotions from your users and opportunities for your business. In the thoughts section, you can include direct quotes from your user research or from your team experiencing the user journey. You can include expectations, questions, or impressions from users.
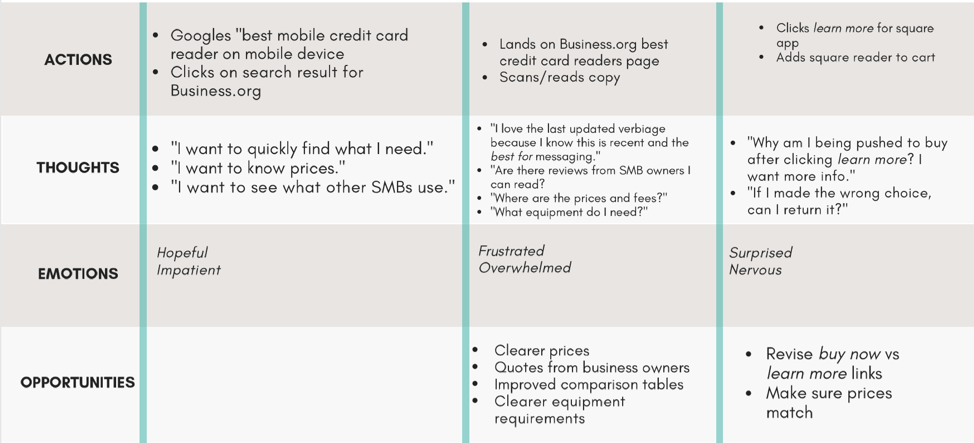
In the emotions section, you’ll include feelings from the user. Sometimes users will tell you how they’re feeling during the journey, but more often than not, you’ll be extrapolating from known data or making assumptions - and that’s okay. Try to keep the emotions specific and concise. It should be easy to scan this section to surface friction points.
The opportunities section should be filled out last - after you’ve filled out all the other sections of your user journey map. That’s because everything above this section should focus solely on the user without any mention of your business or team. In the opportunities section, you switch the focus to what actions your team can take to improve the user experience.
Download our Customer persona guide and template
Understand your primary customers and start creating more consumer-centric web experiences with our customer personas guide and template.
Access the Customer persona guide and template
Tools to use
Designing your user journey map can be intimidating, especially if you're not a designer. However, the purpose of a journey map is to surface opportunities - not win design awards. You can see from my example that even someone with limited design skills can create an impactful, helpful journey map.
There are several free tools you can use to create your map. I created mine using Canva, which offers a free option with built-in templates for user journey maps that are easily customizable. I’ve had colleagues use Google Docs or even PowerPoint if you’re more comfortable with those tools. The creative director I work with prefers UXPressia, which was created for the sole purpose of being able to easily create journey maps, but note that they only offer one free map as a trial, and after that, you must pay for the tool.
However you decide to create your map, remember that the design isn’t as important as the content. If you’re a fabulous designer, that’s wonderful! But if you’re less than comfortable with design, don’t let that hinder your confidence in creating a journey map.
Final thoughts
Creating a customer journey map can be one of the most helpful and eye-opening experiences for your team. It requires time, planning, and patience, but you’re sure to surface “ah-ha” moments. Through the process, your team members will better understand how each of them can influence user experience, and you’ll have allies in your corner to champion the needs of users.
Ashley Walton is VP of Content & Creative at
Clearlink, where she oversees 50+ copy, design, content strategy, and video marketing professionals. With over 10 years of marketing experience, Ashley develops frameworks for creating user-friendly, best-in-class content and creative. Follow her on
Twitter for content marketing tips and self-indulgent food pics.