Only a minority of users tend to go beyond the basics and utilize some of the more advanced features of Google Analytics
Google Analytics is a very powerful analytics tool that’s widely used in marketing departments around the world, with approximately 85% market share across all web traffic analysis tools. However, despite being ubiquitous across the industry, only a minority of users tend to go beyond the basics and utilize some of the more advanced features of the platform.
If you feel you may not be making the most of the tools available in Google Analytics then read on, as we’ll look at a few of the more intermediate and advanced features to help add even more meaningful data to your marketing reports.
Download our Free Resource – Google Analytics Fast Start - 10 mistakes to avoid
This guide in the Smart Insights ‘Fast Start’ series gives you a checklist of issues to review to improve your implementation.
Access the
Reap the benefits of Google Tag Manager
Most of the recommendations you’ll read about here utilize Google Tag Manager (GTM) to enhance your Google Analytics data. Tag Manager acts as a link between your site and your Google Analytics data, helping you to set up marketing tags and tracking without needing to write any code or use your development team’s resources.
If you want to learn more about Google Tag Manager then it’s well worth taking the free course from Google to understand how it works, and whether you can further enhance your marketing reports to reflect your objectives.
Measure on-page readership with scroll tracking
Tracking the readership of your articles and blog content can be a challenge without some additional setup in Google Analytics. Often, you’ll find that article pages have a very high bounce rate. That’s because the majority of article pages receive single-page visits, meaning users don't visit any other page while on your site. The result is a lack of data on how people used your page - did they leave because they couldn’t find what they wanted, or were they able to complete what they needed to do?
Scroll tracking is a solution for this, and a must-have for any content-heavy site. This allows you to trigger Google Analytics events when users reach 25, 50, 75, or any other percentage of your choosing in terms of depth on your page. That means you’ll learn what percentage of users actually read an entire page, or at what point on the page they tend to drop off.
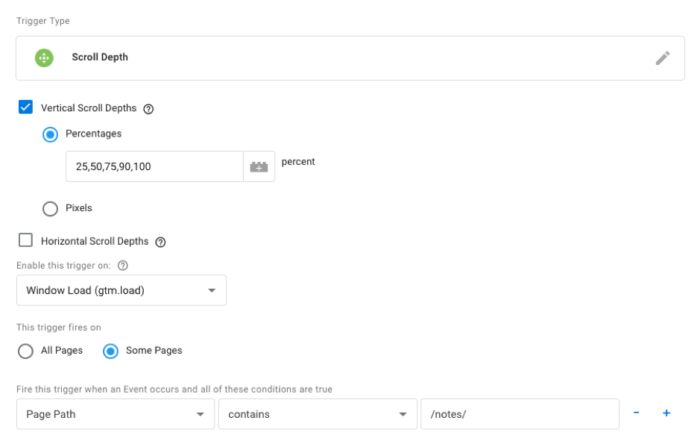
To set this up you’ll need to have Google Tag Manager set up on your site with your Google Analytics tracking tag in place within your GTM container. Start by opening up your website’s container in Tag Manager and navigate to Triggers, click on New, then select the Scroll Depth trigger from the list.
You’ll then need to set the following options:
- Vertical Scroll Depths - I typically use 25, 50, 75, 90 and 100. Both 90 and 100 are in there as in many cases, users won’t scroll all the way to the very bottom - think about how deep your footer is, especially on mobile. 90% may be a more accurate representation of someone reading an entire article
- Horizontal Scroll depths - You can also measure horizontal scrolls, though I rarely use this. Besides, if you’re building websites that go horizontally instead of vertical, you should probably stop!
- All Pages or Some Pages - You may only want to apply scroll tracking to a certain subfolder like your blog, or set up multiple sets of scroll tracking with different depth percentages for different templates or areas of the site
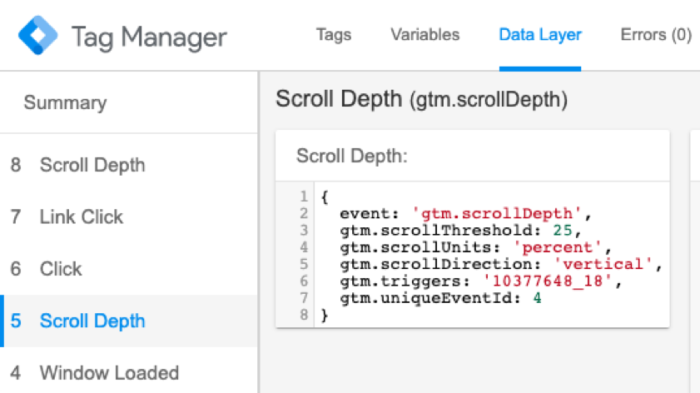
Save your settings, publish your changes, and then use preview mode in Tag Manager to test it’s working. The debug console should show your scroll depth events being triggered under the Data Layer tab:
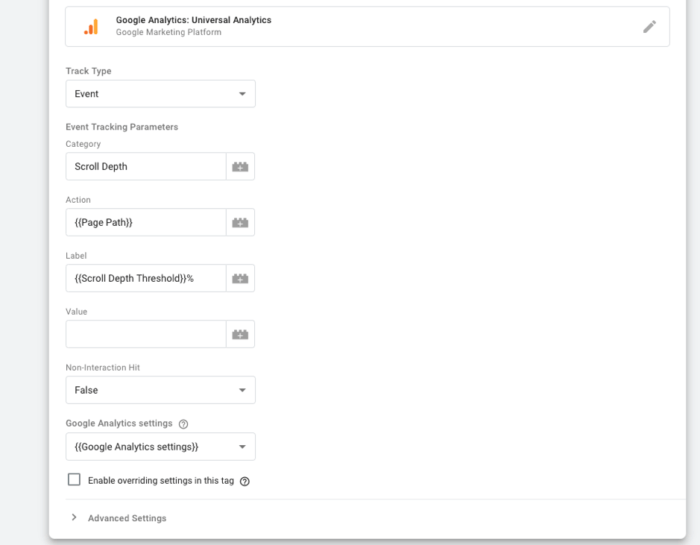
The next step is to set up your Google Analytics Tag using the following steps:
- Click Tag and choose Google Analytics Tag
- Choose Universal Analytics as the tag type
- Name the Category Scroll Depth (include the section of the site if you’ve decided to limit this to a single subfolder rather than the entire site)
- For the Action label, use the Page Path variable to pull in the page’s URL
- For Label, use the Scroll Depth Threshold. You can add a % symbol after the variable (marked by double curly brackets) so the values you get in your Analytics reports will show as 25%, 50%, etc
Publish your changes, and then scroll depth metrics will be accessible under Behaviour > Events in Google Analytics. If you want some ideas on how to visualise this data, check out this tutorial by Alex Reddie on how to present scroll depth in Google Data Studio.
Content groupings
By default, Google Analytics is set up so you can analyze page behaviour by URL or subfolder. But what if you wanted to measure the performance of a specific category of content on your site, or see which author’s content is driving the most leads or has the best readership metrics? This is where content grouping comes in.
You’ll be able to group your content into a logical structure and then analyze aggregated metrics for these groups as well as individual URLs.
If you use WordPress, then this is very easy to set up using Google Tag Manager and the Google Tag Manager for WordPress plugin.
First, set up the GTM plugin on your WordPress site and verify that the GTM container is appearing by using Google Tag Assistant. You may want to ask a developer to do this for you.
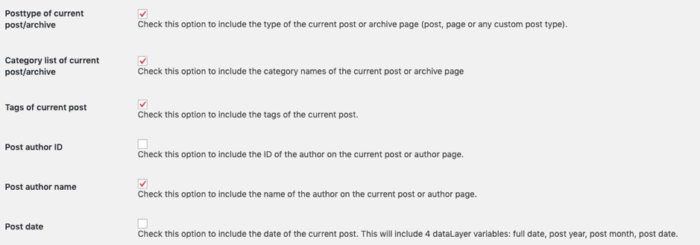
Next, in the WordPress backend, go to Settings > Google Tag Manager, then the Basic Data tab. Here, you can select what content grouping you want to use. I would recommend the following:
- Post type
- Category
- Tag
- Post author name
Hit save and open Google Analytics. Navigate to your main reporting view, and click on Admin. In the third column, click on Content Grouping. Here, you need to assign each of the content groups to an index. Click on New Content Grouping, and name your first group - in this example, we’ll call it Post Category. Click on Enable Tracking Code and select index 1.

Repeat these steps for the other groups:
- Slot 2: Post Tags
- Slot 3: Page Post Type
- Slot 4: Post Author
Finally, the set up needs to be completed in Tag Manager.
You should already have a Google Analytics tag set up on your site tracking all pageviews and applying your UA code. Open this tag and click on the Enable overriding settings in this tag checkbox. Find Content Groups and enter the following settings:
- Index 1: {{Post Category}}
- Index 2: {{Post Tags}}
- Index 3: {{Page Post Type}}
- Index 4: {{Post Author}}
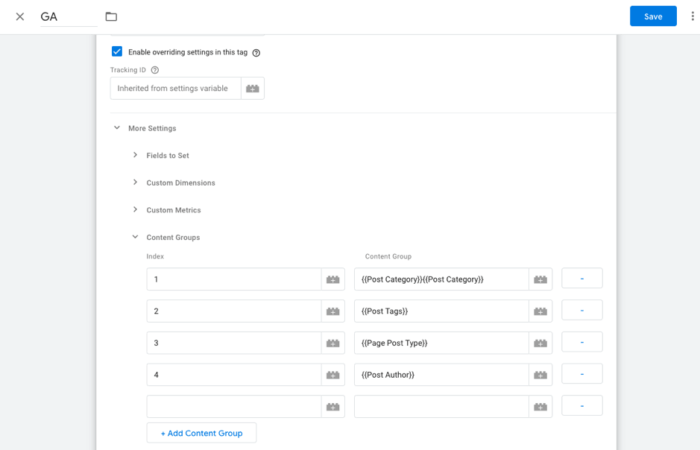
Click on save and then publish your changes. You can now access your aggregated content grouping data in the reports under Behaviour > Site Content using the Content Grouping drop-down:

Track outbound links
Another area to improve the usefulness of your analytics data is to track outbound link clicks. You might want to do this in order to understand where your users land after leaving your site. For example, you might want to understand how many users click on links to third-party resources from blog posts, or if they follow links to your social media profiles from your website.
Again, this is really easy to set up with Google Tag Manager:
- In your website’s container, click Triggers and select New
- Name your trigger “Outbound Link Trigger”
- Choose Click, then in the drop-down, choose Just Links
- Under additional options, click on Wait for Tags and Check Validation
- For the Enable When field, choose Click URL contains * - this selects all pages
- Finally, under Fire On, choose Click URL, does not contain, then enter your domain in the final box
- Click Create Trigger

The next step is to connect the trigger to your Google Analytics Tag. Still, within Tag Manager, complete the following steps:
- Click Tag and choose Google Analytics Tag
- Choose Universal Analytics as the tag type
- Add your Google Analytics Settings variable to the tracking ID
- Choose Event in the Track Type field
- Under Category, choose Outbound Link
- Under Action, choose Click URL
- Under Label, choose Page Path
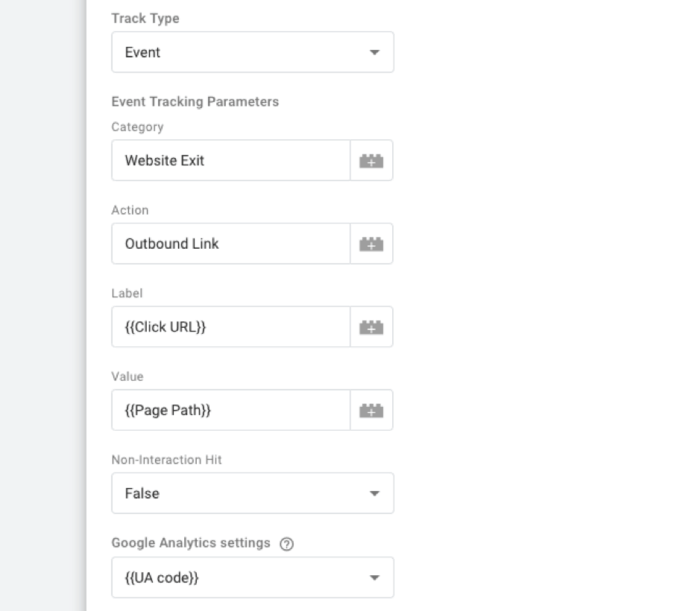
Hit publish. Then, to test this, open up the Real-time event viewer in Google Analytics and click on some outbound links to make sure they trigger correctly.
Track Google My Business searches with UTM parameters
If you have one or more bricks and mortar locations, then you’ve likely set up each with their own Google My Business page, allowing you to appear in Google Maps and local search results. As a result of this, you may see a panel with information about your business appear in Google search results, including a “website” button, such as the one below:
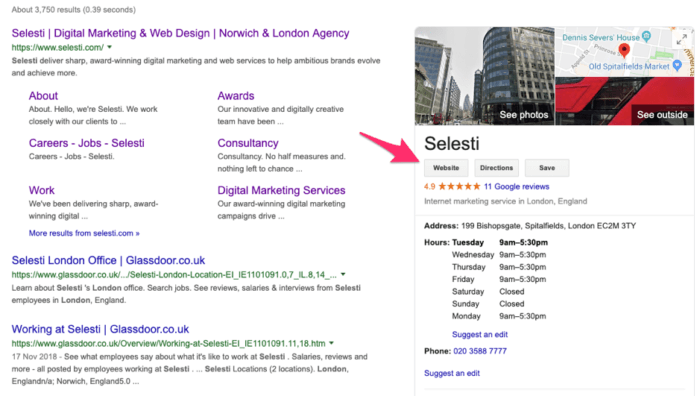
The issue with this button is that if anyone clicks on it, those users get reported in Google Analytics as direct traffic - so it’s not clear where they’ve come from.
If you want to isolate this traffic source and track it more clearly in Google Analytics, the solution is to apply a UTM parameter to the URL assigned to this button. Create your URL using a UTM parameter builder, specifying a source, medium and campaign name based on the way you’d like to track this traffic. Then, update your Google My Business listing website with this URL, and you’re done! Whenever anyone clicks on this, it will track as that campaign, which you can then measure in your Google Analytics reports.
You can also incorporate this traffic into your organic traffic by using “organic” as your campaign medium in your UTM parameter. For many, this makes sense as this traffic technically is organic, however alternatively you can choose any campaign medium of your choice. Just be aware that you may see this traffic listed as (other) in your channels report, which you can find out more about here.
Seb Atkinson is Senior Marketing Manager at
Selesti, an award-winning agency specialising in supercharged search marketing, web design and eCommerce. Seb works with UK-based and global brands, growing their online visibility using SEO and Social Media.