Key issues to consider for the process of using animation to support a marketing campaign
So, your company has decided to introduce animation into your marketing arsenal, but you haven’t got a clue how to start going about the process. Maybe you have an idea for a character, or a sense of the personality you want your brand to share with the public, but how do you get those concepts to become visual, moving, engaging characters, scenes and stories ready to be shared?
With animation, there are many styles to choose from, but only 3 main types. There’s the traditional 2D style (hand drawn on paper or digitally), the ever-popular 3D animation and finally stop motion (or frame-by-frame) animation.
Depending on the actual medium used for each, or combination of mediums, styles and techniques - the possibilities are nearly endless. For our sake, we will focus on 3D animation as the example type/medium for this article.
Computer Generated Imagery (CGI) is hardly something that happens with just the click of a button. The creation of animated sequences requires a tremendous amount of time, energy and strategy. Luckily, if you invest in those, it will likely not be effort wasted.
With proper planning from the outset of the project, you will create characters, storylines and situations your audience will find relateable, and thus will help personify your brand. With the help of character development, engaging imagery and memorable stories, you will create content that sticks in the heads of your audience.
You will boost the company image, reputation and brand identity which in turn, can lead to a significant return on investment (ROI).
Prior to beginning any work on your animated project, make sure you understand every component involved:
- Understand the steps that must be taken, the people that will have a role in the project, the time constraints, and the budget available
- Talk about the current company and brand image
- Identify what elements of your brand are positively viewed, and what you seek to change
- Identify both short and long-term goals of this project. Is it increasing sales? Awareness? Fans on your social media channels?.
Then, once you understand these expectations, moving forward with the project becomes a bit simpler and the project is more likely to be successful upon its completion. Now, all involved – animators, writers, executive leadership, you can get the ball rolling… View the Anatomy of a Scene
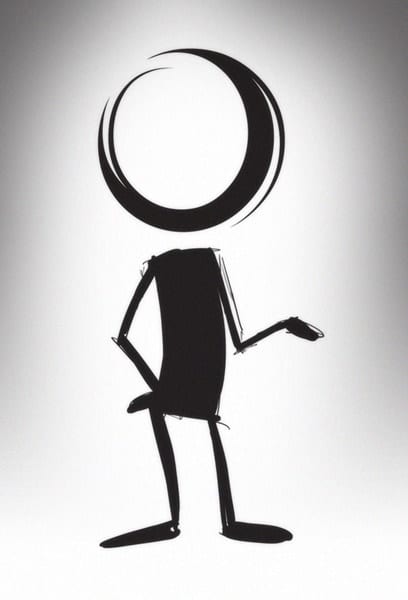
Brainstorm. Ideas are thrown in, thrown out, wrangled up, decided upon and finally scripted. Here, we begin to develop the characters by defining whom they are, facets of their personalities, how they look and the methods by which they communicate.
Once the idea for the character(s) is determined, the layout of the animated piece can be written and approved. This may be a script with dialogue or simply an understanding of how the story will flow.
Close interaction with all people involved will spark new ideas and ensure everyone is satisfied with progress and decisions made at each step.
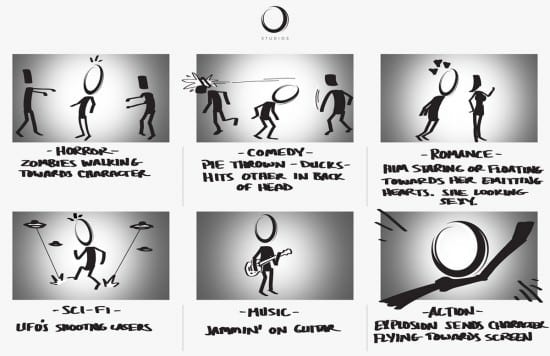
Storyboards are the visual representations of the script that help us see who or what will be seen in each frame of the animated piece, from what angle and for how long. From there, we can determine how many shots will be in a given sequence as well as which shots will be static and which will be moving.
Beginning to visualize the segment here is the main purpose. Continue discussing what messages will be promoted and what emotions might be evoked as the scene progresses, to make sure that as your project ideas evolve, all of your inspired thoughts get worked into the animation.
When you create the animatic, what you’re essentially creating is a moving storyboard. The process begins by recording any dialogue that is needed (voiceover and/or the cast’s characters). Using this recorded voice, the storyboards that were created in step two are laid out on a timeline and put together as if they were film or video.
This helps in deciding the pacing of the sequence, when to cut from shot to shot or how long to hold on someone or something. Placeholder sound effects and music are then added to give a more accurate idea of what to expect from the final sequence.
View the Partial Animatic Scene.
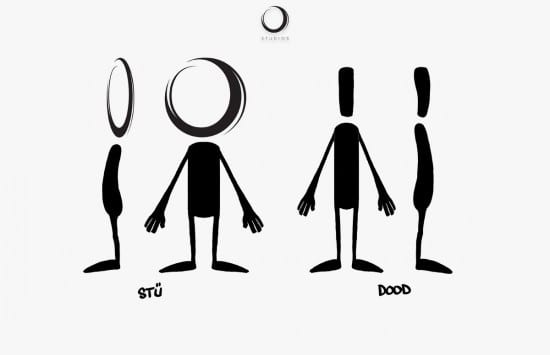
While the story, boards and animatic are being fleshed out, all of the other artwork and assets needed for the piece are concurrently being created. Characters, props and sets are being designed, modeled, rigged and textured to be animation and render ready.
To briefly explain; modeling is essentially creating a 3D digital sculpture of the character, prop or set. If this character or prop needs to move, it will need a skeleton to drive it - much like our bones and muscles move our bodies and this is called rigging.
Not everything in our world is a flat gray color so characters and objects will need colors, textures and even fur and hair; this is called texturing. Once these steps are complete, the character, prop or set is ready for animation, lighting and rendering.
View the Time Lapse Modeling
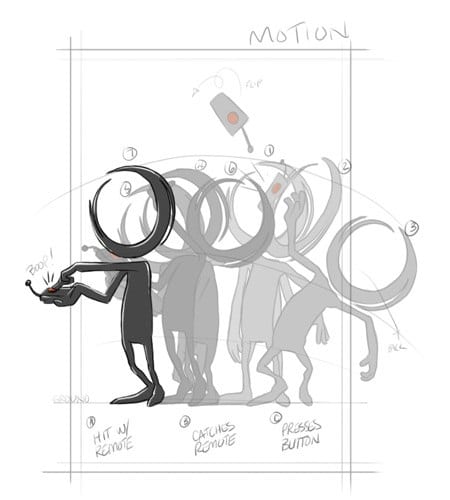
Using the animatic as a visual and audible guide, the animator can start to block out a given sequence, shot by shot. Most of the time, each shot is handled on its own. If applicable, some sequences are animated from start to finish and if necessary, multiple cameras are put in to capture the angles from the storyboards that were created.
When going through different stages of roughs and polish, the animation is "playblasted,” or quickly rendered without textures to see the motion at full speed. These playblasts are cut together to make sure the sequence holds up and flows properly, or if any changes or additions are needed.
View the playblast.
At this point, after final animation is complete, the team begins making the animation look "pretty.” The textures are turned on, lighting is added to the scenes, motion blur is calculated and we render out the animation. The looks of the visual start to come together as you had imagined them in the original sketches and concepts. Once these renders are complete, we then start to composite the different layers and elements together.
Characters are sometimes separate from the background and one another, depending on what is in a given scene. All these layers are pieced together, colour corrected and any effects and motion graphics are added at this point. A strict attention to detail here helps produce quality results, allowing individuals to appreciate the work.
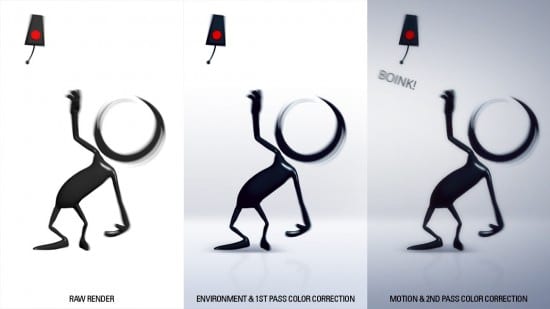
In this final step, we now take all of the final shots, piece them together and prep for final output. If needed, this is also where additional colour correction or edits are made to the sequence. Existing sound from the animatic is dropped in and heavily worked over; this is where sound design happens.
Proper sound effects, music, additional voices and so on are added to really put the icing on the cake - taking the animated piece to the next level. Once complete, mixed and approved, the final sequence is output to the desired formats.
This is now where you are able to step back, be proud of the results, and share it with your audience. With the right distribution channels, these videos can be a tremendously effective tool within your marketing strategy.
Animation is a challenging and time consuming process, but the final product can be quite valuable to a company willing to take it on. Consider integrating these videos and its character(s) within your other marketing efforts to reinforce your brand’s messaging and identity, all to keep your company top of mind among your current and potential customers.
Stay focused on your business goals and let the power of animation work its magic.
View the Studios Ident and View the Studios on Vimeo

Lawrence Basso is the Motion Design Director at
Overit, a leading full-service marketing agency in upstate New York, where he oversees all things related to video, motion graphics, animation and sound. Constantly striving to raise the bar with each project, Lawrence's ultimate goal is to "make really cool stuff" that not only exceeds clients' needs and expectations, but also helps set them apart from competition. With more than 10 years experience in the field, Lawrence has filled many roles throughout the years, including Designer, Illustrator, Photographer and Creative Director. Thanks to Lawrence for sharing his advice and opinions in this post. You can follow him on
LinkedIn or
Twitter.