Using custom audiences to improve Facebook targeting
How would you like to target advertising to people with similar characteristics to your existing customers and prospects? Like subscribers on your mailing list for instance? Well, that's the offer of Facebook's custom audiences. It's no longer new, in fact, checking the Smart Insights alert when it was launched, it dates back to March 2013 - Facebook launches "Lookalike Ad Targeting".
Custom Audiences are one of the more advanced features Power Editor users get to enjoy, Facebook gives you the lowdown on Custom Audiences in its help section but I'll attempt to provide you with a step-by-step guide here.
Firstly, this is not an introduction to Power Editor. If you've not used it before, this tutorial is not necessarily going to make a lot of sense. Power Editor is a useful Chrome app that gives you way more control and functionality than Facebook's Self Serve ad platform. I wouldn't create ads using anything other than Power Editor but it can be quite a complex little tool to get your head around with far from ideal navigation and presentation.
I created a brief introduction to Power Editor by way to create a dark (or unpublished) post recently. If you are new to Power Editor do first check out that article before reading further.
Custom audiences explained
One of the useful things that the Custom Audience tool enables you to do is to reach your current customers with messaging via Facebook. You might want to do this to encourage them to become a fan of your Page, or simply to use an additional channel to attract their attention.
Here's how it works.
Download Power Editor as a Chrome app. Sign into your Facebook account and go to the Audiences tab in the left hand nav.
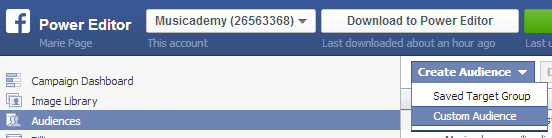
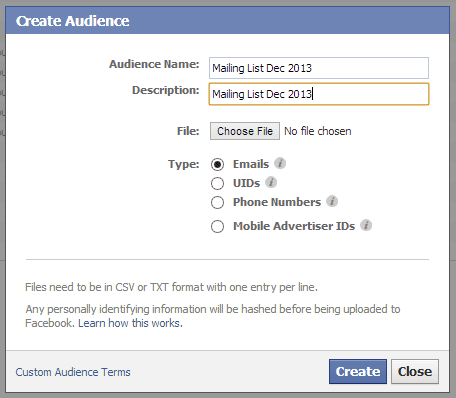
Select "Create Audience" from the top nav. Select "Custom Audience". Give your audience a name and description and upload a CSV file of either email addresses, Facebook user IDs, phone numbers or mobile advertiser IDs. For this example I am uploading a customer mailing list.
Copy and paste the Audience Name into a file somewhere as you will need it later when you create your ad and it's a bit of a pain to retrieve it. I don't always find that Power Editor offers them as a drop down menu - you often have to paste the name in.
Facebook will then crunch its data matching up your email addresses (or other IDs) with it's entire subscriber base. This can take a little time so go away and do something while it works. I uploaded a mailing list of some 24,000 email addresses and Facebook matched 16,000 of them. So that's 16,000 of my email list that has a Facebook account with the same email address.
When you first come back to Power Editor do make sure that you select the "Download to Power Editor" button.
We can now use that custom audience to do a number of things:
- Target ads to people both on our mailing list AND Facebook fans
- Target ads to people on our mailing list but not yet Facebook fans
- Target ads to people that are Facebook fans but on our mailing list
Think about the various applications you might have for this. Really think -spend time thinking about all the creative uses that maximise your marketing efforts.
Option 1 is great for a sales campaign where you want to use multiple channels to get your message across. It's also a better (often more cost effective) option than the "Boost post" button if you want more fans plus your mailing list subscribers to see your content.
Option 2 is perfect if you want to increase your Facebook fan base. I reckon you can really only get away with sending an average of one, maybe two emails a week to a standard list (even that can be too much for some customers), but with Facebook, so long as the content is good, you can message far more regularly. It makes sense therefore to have your customers on a more frequent platform if you can (not withstanding the Facebook Edgerank algorithm which will determine which proportion of fans actually get to see your content - if any one post gets to even a third of your fanbase you are doing well nowadays).
I'd suggest trialling a mix of ads. Don't make them all sales focussed. If you have a great piece of content that perhaps links to a post on your blog then create a sponsored story from it. If you are advertising with the aim of increasing your fan base, make sure you spell out the benefits of Liking the Page.
I also use Option 2 to reinforce sales messages that I have sent out via email. You know that old adage about direct marketing - people need to see the same message multiple times before they bit. Well email and Facebook combined helps you do that.
I love Option 3 and have recently been trialling it with a client with amazing CTR and conversion responses. We'd invested heavily in recent months in ads aimed at increasing the number of fans and had seen a huge increase. However, engagement was fairly low and subsequently organic reach was suffering. We were increasingly having to pay Facebook for reach. That's frustrating when you've already paid to earn the fan. One solution is to try to convince those fans (warm leads if you like) to provide an email address.
Option 3 involved creating a custom audience and using it as an audience I wanted to EXCLUDE from ads. Remember this custom audience is already a fan and is already on our mailing list. By excluding this audience I could target an ad only at Fans that were not on our mailing list. We created a great little incentive and watched the conversions roll in.
Here are the steps involved:
First of all, unless you are directing your ad to an existing Facebook post, you will need to create a dark or "unpublished" post. I explained how to do that in a previous article.
Here's the post I created: https://www.facebook.com/222807424432/posts/10152075438969433
If you click through you'll see you are taken to a page on our website which has some clever coding designed to datacapture email addresses and then present the free gift. We've done this in conjunction with our Mailchimp database.
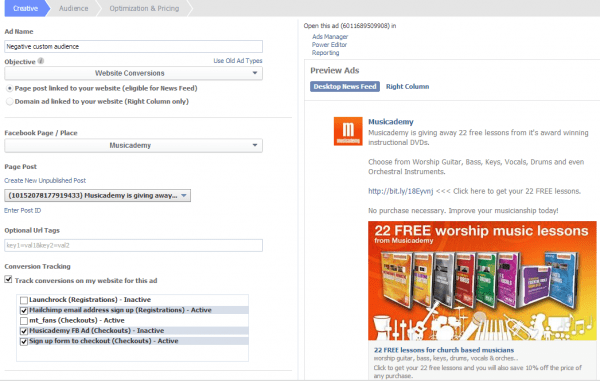
Ad Creative
Now with that campaign selected in the left hand nav, create an ad. I give it the same title as the campaign (and it's not good practice to have more than one ad in a campaign - I know, it's very annoying).
Use the wizard going from Creative through to Audience to Optimization and Pricing. You can see the settings I use in the screen clips below (note that I have conversion pixels set up - it's good practice to do this).
You'll need to select your unpublished post from the Page Post drop down. It will be the one with the half moon symbol.
I am selecting News Feed (Desktop and Mobile). Having tested Right-Hand column ads I've not found them cost effective for my audience. And even if I was using them I'd want to create different ads for them to the News Feed ads.
Now progress to Audience
Audience
The standard audience is fairly straight forward:
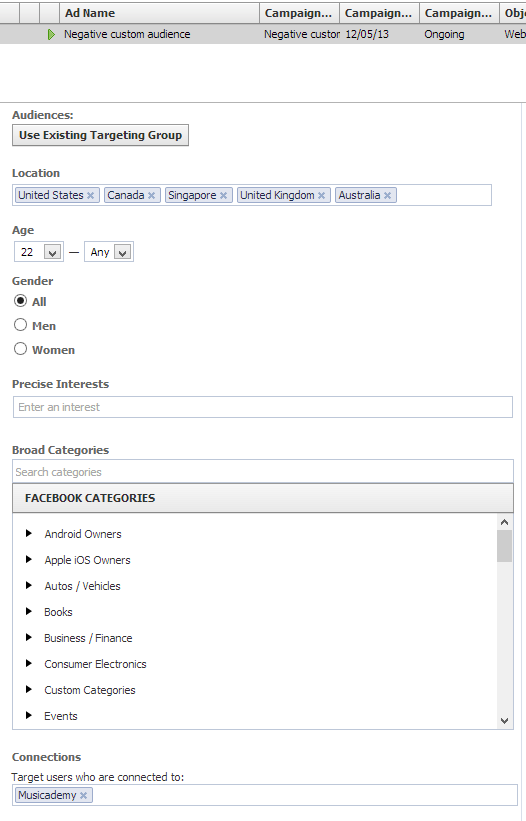
Note that I am selecting particular countries and crucially fans of my Page.
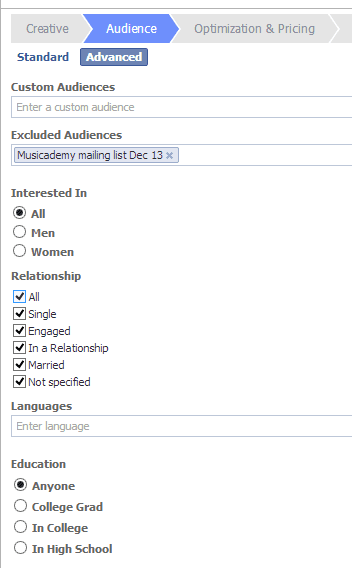
Now here's the clever bit.
Next select "Advanced". You can put in your custom audience here. Depending on which of the options I outlined above you will choose a Custom Audience or an Excluded Audience. I'm doing Option 3 so I'm targeting Musicademy fans who are NOT on my mailing list. This is because the objective of this ad campaign is to increase mailing list numbers from people who have already expressed an interest in the brand by becoming a Facebook fan.
So here is a summary of who we are now targeting (you see this under the ad back in the Standard view of Audiences):

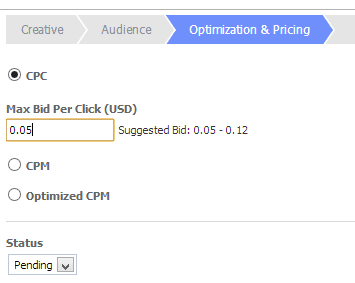
Optimization & Pricing
Now progress to Optimization & Pricing. You have lots of options here. I've tested extensively and for this kind of ad, with my audience I find CPC to be the most cost effective. I wouldn't always go for the lowest option either...
Now press the green Upload Changes button.
Results - checking effectiveness
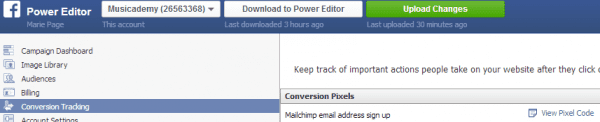
Measurement of ad spend has improved a lot in recent years on Facebook. As well as using conversion pixels you can also use custom utm tracking codes in the links you create in your ad. For this ad I used both a mailing list sign up pixel (see below for where to create these in Power Editor) as well as a checkout conversion pixel.
I tend to use the self serve ad manager to look at the results of my Facebook ads but with the right utm codes set up you can get quite sophisticated with tracking them in Google Analytics too. Crucially with the tracking pixels set up you are not only seeing resulting clicks, Post Likes, Page Likes etc but also conversions to (in this case) mailing list and sales.