8 key issues to review in your post-launch website checklist for Google Webmaster Tools
During the process of creation of a website, lots of individuals (account managers, designers, developers and SEOs) will have spent many hours to create the best experience possible. But this can be wasted if certain checks aren't made after launch to ensure that everything is running smoothly from SEO.
Apart from the essential Google Analytics customisations I described previously and review of routine onsite SEO checks (e.g. proper implementation of meta titles, meta descriptions, text links, heading tags, 301 redirections etc.), it is also essential not to check Google Webmaster tools as part of the post-launch process. In this post I will take you through the checks I regularly make as a guide.
1. Verification of the Site on Google Webmaster Tools
Why do we need to verify the ownership of our website? According to Google Webmaster Tools: ‘we need to know you own a site before we'll show you certain information about it or enable you to use our tools’. Additionally, by having our site verified on Google Webmaster Tools, it will help us on submitting the sitemap.xml, monitoring our crawl errors, monitoring our search queries, create our structured data etc., which will be analysed below.
This is the step by step process for the verification of the site:
Step 1 and 2
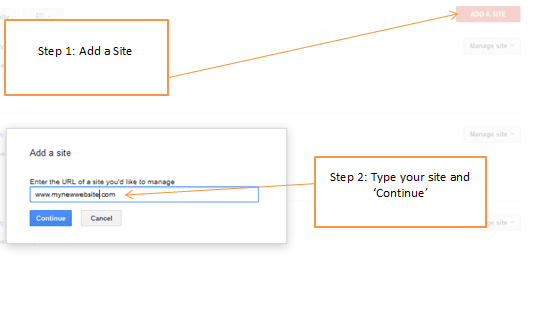
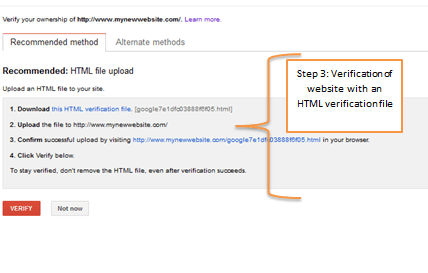
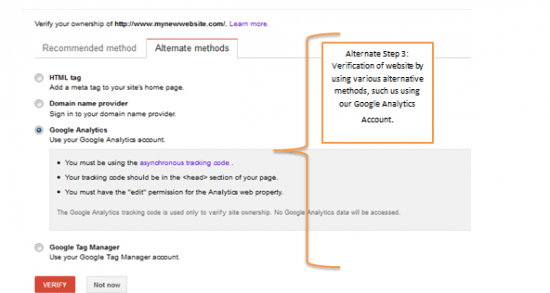
Step 3
After adding the site on Google Webmaster Tools, we will need to finalise the process by verifying the website. There’s a wide variety of options, such as the HTML file upload (which is recommended by Google), however this process requires the assistance of your development team since they have to upload the HTML verification file on the website. This HTML file will look something like that:
[google7e3aac013888f6f05.html]
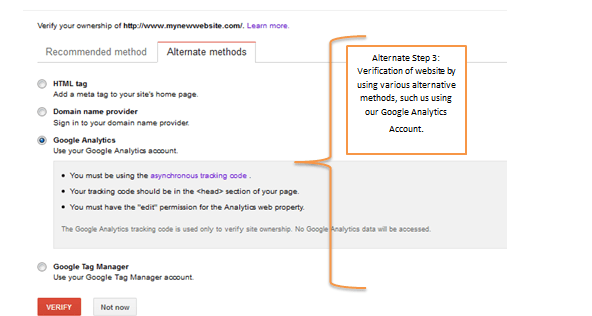
An alternative solution
On the other hand, there are various alternate methods (and my personal favourite), that do not require our developer’s assistance and all we have to do is to use our Google Analytics account as long as we are using the asynchronous tracking code (not the traditional one).
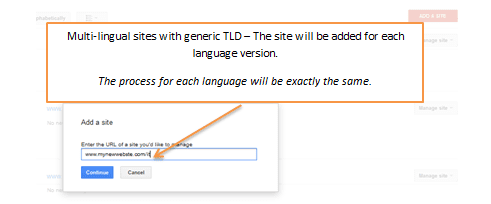
2. Multilingual sites
In the event that our website is multilingual and its generic TLD (Top Level Domain) is .com or .net, in this case we will need to repeat the above process.
Example of a multi-lingual website: www.mynewwebsite.com (and has multiple language versions, e.g.: French, Greek, Russian, Italian etc.)
3. Geotargeting
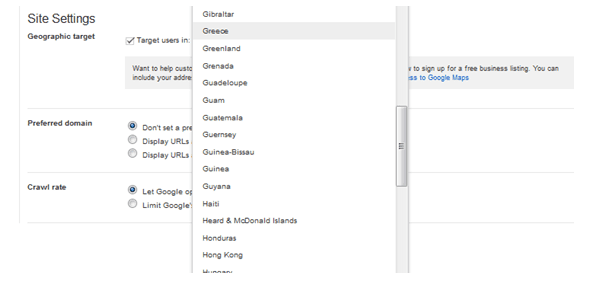
Once we have launched a website, with a generic TLD (such as .com), with various language versions (e.g. French, Italian , German, Greek etc.) then we will need to target these users in each particular geographic region.
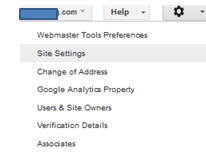
STEP 1 – Go to Settings > Site Settings.
STEP 2 – Target users that correspond to the countries for which we have the respective language versions.
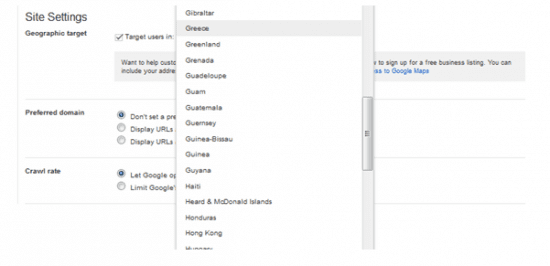
In other words, we need to implement the exact same process for each language version of our site:
www.mynewwebsite.com/it (for each language adjust your geographic targeting to the country for which you have a language version – the case in point in Italian).
www.mynewwebsite.com/ru (for each language adjust your geographic targeting to the country for which you have a language version – the case in point in Russian).
www.mynewwebsite.com/gr (for each language adjust your geographic targeting to the country for which you have a language version – the case in point in Greek).
4. Sitemap.xml Submissions (Country Top Level Domains)
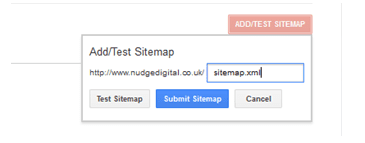
Once we launch our website and we have country top level domains (e.g. .co.uk, .gr, .it, .tr) and once we have edited our Frequencies and Priorities for our Sitemap.xml, then all we need to do is to submit the sitemap.xml on Google Webmaster Tools by simply filling out the empty bar as shown on the screenshot below.
We are going to find the sitemaps section on : Crawl > Sitemaps.
For generic TLDs (e.g. .com, .net etc.)
In the case of generic TLDs we will need to implement the same process for each language version of our website.
When it comes to a TLD such as .com:
http://www.mynewwebsite.com/it/sitemap.xml
http://www.mynewwebsite.com/gr/sitemap.xml
http://www.mynewwebsite.com/fr/sitemap.xml
5. Implementation of Structured Data
If we are handling e-commerce websites that are recently launched we can create for our individual products using the Data Highlighter, by simply marking up our information.
What’s the usefulness of structured data for SEO? Structured data, if implemented correctly, can provide on search engine results, the so called rich snippets instead of plain snippets.
For instance, for ‘’souvlaki recipe’’, if we perform a query we can see 2 different types of results: one with plain snippets and another one with rich snippets, as we can see in the screenshot below.

In other words, structured data can help us:
- Improve our click-through-rate.
- Improve our conversion rates/sales.
Depending on the level of our familiarity with HTML we can use the Structured Data Mark-up Helper and if we need any extra step-by-step instructions we can read through the respective guide.
Using the Data Highlighter, we will not bother the development team (as the use of the Structured Data Markup Helper will require our development team’s assistance, depending on the level of our familiarity with coding).
Without any further ado, we can implement the steps in order to tag our data items using the Data Highlighter.
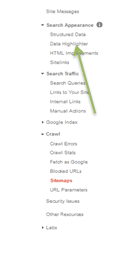
STEP 1
Go to Search Appearance > Data Highlighter
STEP 2
Enter the URL of the specific page in which we would like to tag all the necessary data.
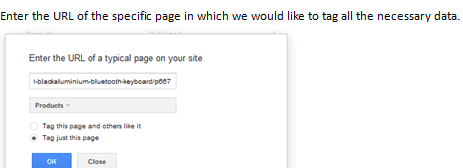
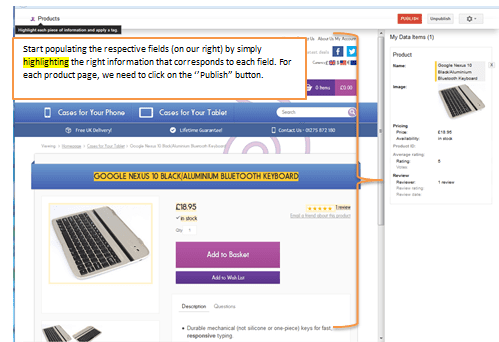
STEP 3
Start populating with data our respective fields.
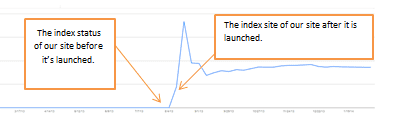
6. Google Index- Index Status
Once our brand new site is launched, then we need to make sure that our site will be indexed by Google.
7. Fetch as Google
If we want to index our content faster the Fetch as Google tool, will allow us to submit our URLs to the index. The Fetch as Google is used to see the crawl status for live pages and to submit URLs to the Google index for faster indexing.
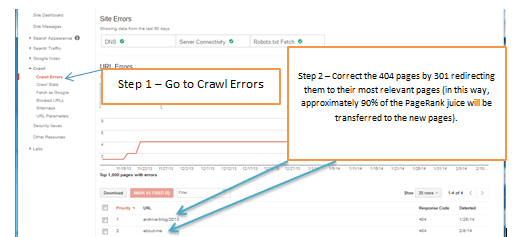
8. Crawl Errors
Once the website is launched and our site has been crawled and indexed by search engine spiders, it is likely that we see that some of our pages are 404 pages.
A 404 page is an indicator of poor user experience and a low quality signal for engine spiders. However, it is quite easy to fix this issue by 301 redirecting (permanent redirection) the 404 pages to their most relevant pages.
Summary
To summarise, our checklist on Google Webmaster Tools (after the launch of our website) should include the following actions:
- Verification of the site on Google Webmaster Tools
- If the website’s TLD is .com and it is a multilingual website as well, then add the website for each language version. Example: com/gr (+add site), .com/ru (+add site), .com/fr (+add site) etc.
- Geotargeting - If the TLD , for instance is, .com, certain actions should be taken as indicated above for each language version.
- Sitemap submissions for: a. multilingual websites b. non multilingual websites.
- Implementation of Structured Data.
- Google Index and Fetch as Google.
- Review Crawl Errors.
*Regarding Search Queries, it’s not something that we can immediately check after the launch of our new website. By default, Google shows the data of the last 90 days but it’s up to us to define the date range that we would like to review (no longer than 90 days). However, to evaluate our initial data it would be advisable to conduct an initial assessment 3-5 weeks after the launch of the site.
Are there any other actions that you take into consideration after launching a new site regarding Google Webmaster Tools?